# PE Parser - peXtractor
## Overview
Okay, so we did talk about the structure of a PE file in the previous post and it was all theory, today I would like to talk about how we can actually parse the PE manually and compare it with the output of an actual PE parser like PE bear. I have uploaded this on [github](https://github.com/ZzN1NJ4/peXtractor) so you can check that out if required. So let's start right away.
## 1. Magic Bytes
The very first thing we would do is to read the file (after checking it exists) and then allocate all the data to a buffer which we would use it later for analysis. Firstly we would compare the magic bytes of the file which should equate to "**MZ**" or `0x5A4D`. So let's use a file pointer to open the file and read all of the data to then allocate it to a heap memory
```c
FILE* fp = fopen(fileName, "rb");
if (!fp) { warn("cant find the file"); exit(0); }
fseek(fp, 0, SEEK_END);
fSize = ftell(fp);
fseek(fp, 0, SEEK_SET);
unsigned char* pFile = (unsigned char*)malloc(fSize);
if (!pFile) { fclose(fp); return FALSE; }
fread(pFile, 1, fSize, fp);
fclose(fp);
```
The first `fseek` command is to read the file till the end, to get the size of the file, and then allocate heap memory of that size, and read again till that size. Now we have the required buffer. Let's check the first 2 bytes of it. `if(pFile[0] == 0x4d && pFile[1] == 0x5A)` then we continue our code, this check isn't the most efficient since any file starting with MZ will be treated the same, but Its fine for now ig. Later I realized that for getting the imported libraries & functions, its better to call `CreateFileA` to get handle to the file and then read it , so Ill show that as well.
```c
HANDLE hFile = CreateFileA(fileName, GENERIC_READ, 0, 0, OPEN_EXISTING, FILE_ATTRIBUTE_NORMAL, 0);
if (hFile == INVALID_HANDLE_VALUE) {
warn("Error getting Handle to file : %d", GetLastError());
exit(0);
}
//fSize = GetFileSize(hFile, NULL);
LPVOID pFile2 = VirtualAlloc(NULL, fSize, MEM_COMMIT, PAGE_READWRITE);
ReadFile(hFile, pFile2, fSize, &bytesRead, NULL);
....
if(hFile) CloseHandle(hFile);
```
Then I referred to this [MSDN page](https://learn.microsoft.com/en-us/windows/win32/seccrypto/example-c-program--creating-an-md-5-hash-from-file-content) to get md5sum of a file, and used it to print the md5sum of our PE file. Here's the sample output
```
[*] Magic Bytes: MZ
[*] File Size is 90112 bytes
[*] File Name: peXtractor.exe
[*] MD5 hash : d41d8cd98f00b204e9800998ecf8427e
[*] 64-Bit PE File
```
## 2. DOS Header & Stub
Moving on, Let's get a pointer to the DOS Header, we know that its a `_IMAGE_DOS_HEADER` structure and since it is the very start of the file, we can do something like this to get the pointer. Then we can print the magic bytes of the file using the pointer.
```c
PIMAGE_DOS_HEADER pDOSHeader = (PIMAGE_DOS_HEADER)pFile2;
print("Magic Number : 0x%X", pDOSHeader->e_magic);
```
There are also cases , although rare, that the DOS Stub has been modified, this part generally runs whenever the executable is loaded in **MS-DOS** application/shell. Modern PE just print the message that it can't be run in **DOS** mode and exit, we can look at PE bear to check this message.
DOS Stub
[0xrick](https://0xrick.github.io/win-internals/pe3/) has also shown how he analyzed the dos stub so go check that out if you want to understand more about it. Since the stub is same for every binary, I've hardcoded to check whether the DOS Stub in the given PE file is same or not, if it isn't, then we know that the Stub might have been modified.\
Since the DOS Header remains 64 bytes, I just add that to `pFile` (the start of PE file) to reach the Stub.
```c
unsigned char dos_stub[64] = {
0x0E, 0x1F, 0xBA, 0x0E, 0x00, 0xB4, 0x09, 0xCD, 0x21, 0xB8, 0x01, 0x4C, 0xCD, 0x21, 0x54, 0x68,
0x69, 0x73, 0x20, 0x70, 0x72, 0x6F, 0x67, 0x72, 0x61, 0x6D, 0x20, 0x63, 0x61, 0x6E, 0x6E, 0x6F,
0x74, 0x20, 0x62, 0x65, 0x20, 0x72, 0x75, 0x6E, 0x20, 0x69, 0x6E, 0x20, 0x44, 0x4F, 0x53, 0x20,
0x6D, 0x6F, 0x64, 0x65, 0x2E, 0x0D, 0x0D, 0x0A, 0x24, 0x00, 0x00, 0x00, 0x00, 0x00, 0x00, 0x00
};
unsigned char* pe_dos_stub = 0x00;
for (; dos_counter < 64; dos_counter++) {
pe_dos_stub = *(unsigned char*)(pFile + 64 + dos_counter);
//printf("0x%X\n", dos_stub[dos_counter]);
if (pe_dos_stub != dos_stub[dos_counter]) {
imp("DOS Stub seems to be customized, skipping check for Rich Header");
_CUSTOMIZED_DOS_HEADER = TRUE;
goto noRich;
}
}
```
Although I still can check for Rich Header when there is a different DOS Stub, but I felt that case would be very rare and so maybe I'll add the support later.
Anyways, we know that the next comes NT Headers but for some executables that are build using Microsoft's Visual Studio & Visual Studio Code, there exists another header called the Rich Header. You can look at [this](https://www.virusbulletin.com/virusbulletin/2020/01/vb2019-paper-rich-headers-leveraging-mysterious-artifact-pe-format/) or [this](https://github.com/RichHeaderResearch/RichPE/blob/master/Shmoocon%20Talk.pdf) page for more information on them. Sample output below
```
################## D O S H E A D E R ##################
[*] Magic Number @-- 0x5A4D
[*] NT Header Offset @-- 0xF0
[*] pe_start + 0x3C @-- 0xF0 (should be same as above)
[*] Relocation Table @-- 0x40
[*] Relocations @-- 0x0
[*] Pages in File @-- 0x3
[*] Checksum @-- 0x0
[+] Rich Header may be present
```
DOS Header in PE-bear
## 2.5 Rich Headers
Rich Header is basically a header which contains the information related to the tools used to compile the executable and their specific version. It contains the key `DanS` (encrypted) at the start and ends with `Rich` and then 4 bytes of key which is the key used to **XOR** the whole header. Note that the "Rich" string is after the header has been **XOR'ed** and the `DanS` is before **XOR**-ing so we probably should look for the latter.
The simple way to check if the Rich Header exists or not was to check if the end of DOS Stub and the start of NT Headers is the same or not, if the start of NT Headers is bigger, then its quite possible that either the DOS Stub was modified or Rich Header is present.
Also we can check for the string "Rich" which is present at the end - 4 bytes of the header. So armed with these 2 ways I start checking for the Rich Header.
```c
// more than 128 (dos Header + dos Stub) , then possible Rich Header exists
if (pDOSHeader->e_lfanew > 0x80) {
okay("Rich Header may be present\n");
}
```
Since the header is encrypted, we should get the `XOR` key first, I look for the "Rich" string and assign the next 4 bytes to the key. Although there could be better way to do this (since it can be modified, maybe someone manually adds this before to delay analysts), for now its fine.
```c
unsigned char rich_stub[] = { 0x52, 0x69, 0x63, 0x68 };
unsigned char xor_key[4] = { 0x00 };
unsigned char rich_start[4] = { 'D', 'a', 'n', 'S' };
for (; rSize < len; rSize++) {
if (pFile[128 + rSize] == rich_stub[0]) {
if (pFile[128 + rSize + 1] == rich_stub[1] && pFile[128 + rSize + 2] == rich_stub[2] && pFile[128 + rSize + 3] == rich_stub[3]) {
found = TRUE;
rSize += 4;
xor_key[0] = pFile[128 + rSize];
xor_key[1] = pFile[128 + rSize + 1];
xor_key[2] = pFile[128 + rSize + 2];
xor_key[3] = pFile[128 + rSize + 3];
break;
}
}
}
if (found == FALSE) {
return FALSE;
}
....
unsigned char* rich_header = (pFile + offset); // offset = 128
// size - 4, since we dont have any need for "Rich" / XOR key further
for (size_t j = 0; j < rSize - 4; j++) {
rich_header[j] = rich_header[j] ^ xor_key[j % 4];
//printf(" 0x%X ", rich_header[j]);
}
// Compare "DanS"
for (size_t i = 0; i < 4; i++) {
if (rich_header[i] != rich_start[i]) {
warn("Can't seem to compare Rich Header start");
return FALSE;
}
}
....
```
Now parsing and printing the information from the Rich Header was a bit lengthy and I will just show how a `CompID` gives us necessary information. For this I did refer to how [PE-bear parses](https://github.com/hasherezade/bearparser/blob/master/parser/pe/RichHdrWrapper.cpp) the rich header. So using PE-bear, we see the contents of Rich Header.
Rich Header
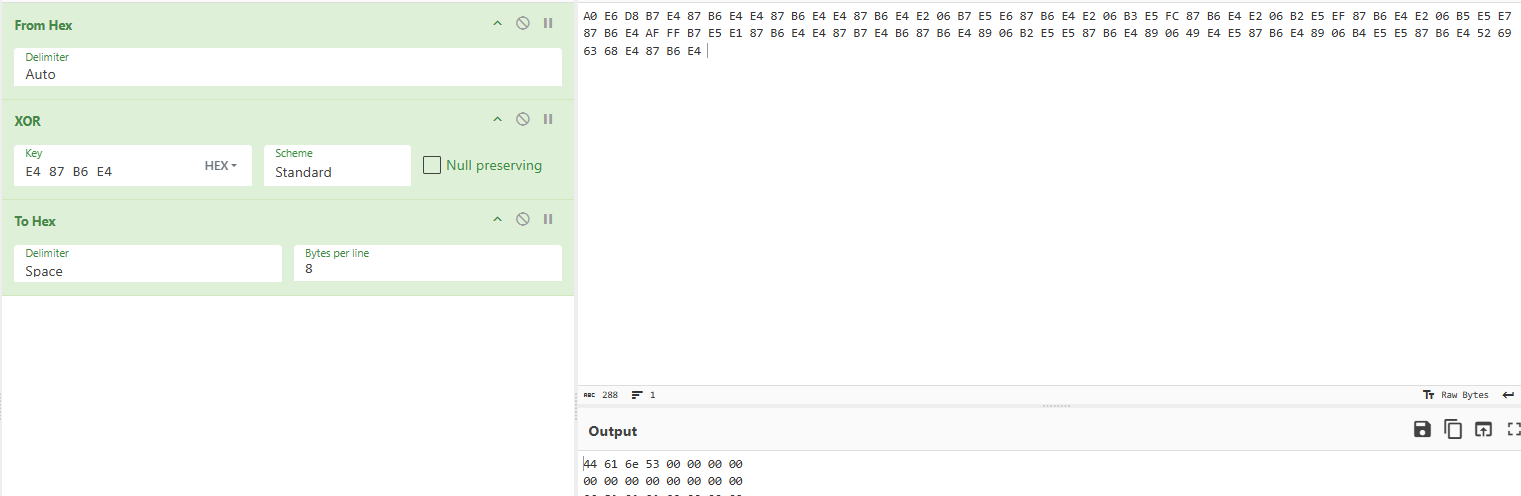
We can throw that hex to [cyberchef](https://gchq.github.io/CyberChef/#recipe=From_Hex\('Auto'\)XOR\(%7B'option':'Hex','string':'E4%2087%20B6%20E4'%7D,'Standard',false\)To_Hex\('Space',8\)\&input=QTAgRTYgRDggQjcgRTQgODcgQjYgRTQgRTQgODcgQjYgRTQgRTQgODcgQjYgRTQgRTIgMDYgQjcgRTUgRTYgODcgQjYgRTQgRTIgMDYgQjMgRTUgRkMgODcgQjYgRTQgRTIgMDYgQjIgRTUgRUYgODcgQjYgRTQgRTIgMDYgQjUgRTUgRTcgODcgQjYgRTQgQUYgRkYgQjcgRTUgRTEgODcgQjYgRTQgRTQgODcgQjcgRTQgQjYgODcgQjYgRTQgODkgMDYgQjIgRTUgRTUgODcgQjYgRTQgODkgMDYgNDkgRTQgRTUgODcgQjYgRTQgODkgMDYgQjQgRTUgRTUgODcgQjYgRTQgNTIgNjkgNjMgNjggRTQgODcgQjYgRTQg) and analyze it manually, (check [this link](https://gchq.github.io/CyberChef/#recipe=From_Hex\('Auto'\)XOR\(%7B'option':'Hex','string':'E4%2087%20B6%20E4'%7D,'Standard',false\)To_Hex\('Space',8\)\&input=QTAgRTYgRDggQjcgRTQgODcgQjYgRTQgRTQgODcgQjYgRTQgRTQgODcgQjYgRTQgRTIgMDYgQjcgRTUgRTYgODcgQjYgRTQgRTIgMDYgQjMgRTUgRkMgODcgQjYgRTQgRTIgMDYgQjIgRTUgRUYgODcgQjYgRTQgRTIgMDYgQjUgRTUgRTcgODcgQjYgRTQgQUYgRkYgQjcgRTUgRTEgODcgQjYgRTQgRTQgODcgQjcgRTQgQjYgODcgQjYgRTQgODkgMDYgQjIgRTUgRTUgODcgQjYgRTQgODkgMDYgNDkgRTQgRTUgODcgQjYgRTQgODkgMDYgQjQgRTUgRTUgODcgQjYgRTQgNTIgNjkgNjMgNjggRTQgODcgQjYgRTQg) for anyone curious). As we see that the Header has been **XORed** using the last 4 bytes of itself.
Rich Header decrypted
we can check the first 4 value which represents the `DanS` string.
Rich Header in PE-bear
Alright, so after the `DanS` id, there are 3 checksumed padding which appears to be NULL, after which we have a series of `Comp ID` which maybe stands for `Compiler ID` ? not sure, anyways its of 8 bytes and the way it is structured is 2 bytes each represent a number. So lets assume the `CompID` of `E2 06 B7 E5 E6 87 B6 E4` which is the encrypted one, but after **XOR** it becomes \
`06 81 01 01 02 00 00 00` and since this is in little endian, we first need to convert it to big endian using [left shift](https://en.wikipedia.org/wiki/Logical_shift) operation which I talked about in [this post](https://reze.gitbook.io/bin/assembly-x86/x86-architecture-overview#shift).
```c
// As we know 2 bytes represent a number, we take the
// first 2 bytes and convert it to big endian
// Comp ID is 06 81 01 01 02 00 00 00
// we take first 2 bytes, 06 81
// compid[1] << 8 means we shift 0x81 by 8 bits, i.e 1 byte
// so compid now becomes 0x8100
// now we OR the shifted bytes with compid[0] 0x06 , which is basically add
// so compid_1 becomes 0x8100 + 0x60 = 0x8106
unsigned int compid_1 = (compid[1] << 8) | compid[0];
unsigned int compid_2 = (compid[3] << 8) | compid[2];
unsigned int compid_3 = (compid[5] << 8) | compid[4];
printf("%u.%u.%u", compid_1, compid_2, compid_3);
```
Now this `compid_1` which is `0x8106` is just **33030** in decimal which is what we convert them into.\
`compid_2` is `0x0101` which is **257** in decimal,\
`compid_3` is `0x0002` which is **2** in decimal.
The first part represents the Build ID which is 33030 , the 2nd part represents the Visual Studio version as well as the `productID` for which I referred [this github repo](https://github.com/kirschju/richheader/blob/master/prodids.py) so check them out. and the last part is count, which I believe is the number of times each object is used? (checkout [this pdf](https://github.com/RichHeaderResearch/RichPE/blob/master/Shmoocon%20Talk.pdf)). Anyways, that's how we print information regarding the Rich Header. Sample output below
```
################## R I C H H E A D E R ##################
[+] XOR Key: 0xCA73E47
[*] Rich Header Size : 104
[test] Comp ID : compid-hex : meaning : buildid : count : productid : version
[0] Comp ID: 0x0681010102000000 : 33030.257.2 : 33030 : 2 : Implib1400 : Visual Studio 2015 14.00
[1] Comp ID: 0x0681FD0001000000 : 33030.253.1 : 33030 : 1 : AliasObj1400 : Visual Studio 2013 12.10
[2] Comp ID: 0x0681050118000000 : 33030.261.24 : 33030 : 24 : Utc1900_CPP : Visual Studio 2015 14.00
[3] Comp ID: 0x068104010B000000 : 33030.260.11 : 33030 : 11 : Utc1900_C : Visual Studio 2015 14.00
[4] Comp ID: 0x0681030103000000 : 33030.259.3 : 33030 : 3 : Masm1400 : Visual Studio 2015 14.00
[5] Comp ID: 0x4B78010107000000 : 30795.257.7 : 30795 : 7 : Implib1400 : Visual Studio 2015 14.00
[6] Comp ID: 0x0000010058000000 : 0.1.88 : 0 : 88 : Import0 : Visual Studio
[7] Comp ID: 0x6D81040101000000 : 33133.260.1 : 33133 : 1 : Utc1900_C : Visual Studio 2015 14.00
[8] Comp ID: 0x6D81FF0001000000 : 33133.255.1 : 33133 : 1 : Cvtres1400 : Visual Studio 2015 14.00
[9] Comp ID: 0x6D81020101000000 : 33133.258.1 : 33133 : 1 : Linker1400 : Visual Studio 2015 14.00
```
### Removing Rich Header
Also apart from modifying the **exe** to remove the Rich Header, we can give the `/emittoolversioninfo:no` flag to `link.exe` to disable generating one (from [this post](https://developercommunity.visualstudio.com/t/Add-linker-option-to-strip-Rich-stamp/740443)). So just open the **Projects -> Properties -> Linker -> CommandLine** and add the flag to remove it. There could be some version related reason why it doesn't remove the Header. Although I had the latest version for Visual Studio, this didn't work for me and [further research](https://news.ycombinator.com/item?id=32921086) showed that this doesn't work anymore. So if you still want to remove it, maybe use a hex editor to manually remove the Rich Header or use a tool like [rich header erasure](https://github.com/lordmulder/rich-header-eraser).
## 3. NT Header
we get the NT Header by referring to the last member of the DOS Header, `e_lfanew` since this is an offset to NT Header, we need to add this to the start of the PE file, after which we can print information related to this Header. Although it's different for different architecture, I'll talk about why it is fine to not have different case for it during Optional Header.
```c
PIMAGE_NT_HEADERS pNTHeader = (PIMAGE_NT_HEADERS)((DWORD_PTR)pFile2 + (DWORD_PTR)pDOSHeader->e_lfanew);
info("NT HEADER @-- 0x%X", pNTHeader);
info("Signature @-- 0x%X", pNTHeader->Signature);
```
There isn't much information particular to this header, but it points to 2 other headers which are File Header & Optional Header. Sample output below
```
################## N T H E A D E R ##################
[*] NT HEADER @-- 0xD03700F0
[*] Signature @-- 0x4550
```
## 4. File Header
The File Header remains unchanged for different architectures (32 / 64 bit) so we don't need to think much to get to it. Sample output provided below
```c
IMAGE_FILE_HEADER pFileHeader = pNTHeader->FileHeader;
info("Machine @-- 0x%X", pFileHeader.Machine);
info("No. of Sections @-- %d", pFileHeader.NumberOfSections);
// This is also how I check if the PE file is for 32/64 bit architecture
// IMAGE_FILE_32BIT_MACHINE expands to 0x100
if (pFileHeader.Characteristics & IMAGE_FILE_32BIT_MACHINE) {
pOptionalHeader32 = ((PIMAGE_NT_HEADERS32)pNTHeader)->OptionalHeader;
_32_BIT = TRUE;
info("32-Bit PE File \n");
}
else info("64-Bit PE File \n");
```
```
################## F I L E H E A D E R ##################
[*] FILE HEADER @-- 0x8F4FF860
[*] Machine @-- 0x8664
[*] No. of Sections @-- 10
[*] No. of Symbols @-- 0
[*] Pointer to Symbol Table @-- 0x0
[*] Characteristics @-- 0x22
[*] Optional Header Size @-- 0xF0
```
## 5. Optional Header
Optional Header is different on different architecture and it does consists of extra members based on that. So we do need to be careful when handling this. I check the architecture of the PE file and handle the case accordingly.
```c
pOptionalHeader = pNTHeader->OptionalHeader;
....
if (pFileHeader.Characteristics & IMAGE_FILE_32BIT_MACHINE) {
pOptionalHeader32 = ((PIMAGE_NT_HEADERS32)pNTHeader)->OptionalHeader;
_32_BIT = TRUE;
info("32-Bit PE File \n");
}
info("Magic @-- 0x%X", pOptionalHeader.Magic);
info(".text Size @-- 0x%X", pOptionalHeader.SizeOfCode);
info("Entry Point @-- 0x%X", pOptionalHeader.AddressOfEntryPoint);
if (_32_BIT) info("Base of Data @-- 0x%X", pOptionalHeader32.BaseOfData);
```
Now one might wonder if there are different version for 32/64 bit, why am I using the 64 bit to print some of the members. Let's look at both of them to understand how using 64 bit doesn't have any effect if the executable is 32 bit.
```c
typedef struct _IMAGE_OPTIONAL_HEADER64 {
...
DWORD BaseOfCode;
ULONGLONG ImageBase;
DWORD SectionAlignment;
...
} IMAGE_OPTIONAL_HEADER64, *PIMAGE_OPTIONAL_HEADER64;
typedef struct _IMAGE_OPTIONAL_HEADER {
...
DWORD BaseOfCode;
DWORD BaseOfData;
DWORD ImageBase;
DWORD SectionAlignment;
...
} IMAGE_OPTIONAL_HEADER32, *PIMAGE_OPTIONAL_HEADER32;
```
The only difference is the extra member `BaseOfData` in 32-bit version and the type of `ImageBase` . If we calculate the sizes, this doesn't have any affect since the 2 [**DWORD**](https://learn.microsoft.com/en-us/openspecs/windows_protocols/ms-dtyp/262627d8-3418-4627-9218-4ffe110850b2) (`BaseOfData & ImageBase`) in 32-bit have the same size (**4+4= 8 bytes**) as 1 [ULONGULONG](https://learn.microsoft.com/en-us/openspecs/windows_protocols/ms-dtyp/c57d9fba-12ef-4853-b0d5-a6f472b50388) (`ImageBase`) in 64-bit of **8 bytes**.. So referring to the other members of the structure can be done with the same offset regardless of the architecture which is why we can use the 64-bit version to refer to the other members. Sample output below
```
################# O P T I O N A L H E A D E R #################
[*] OPTIONAL HEADER @-- 0xEBD8F6F0
[*] Magic @-- 0x20B
[*] .text Size @-- 0xA800
[*] Entry Point @-- 0x112BC
[*] Base of Code @-- 0x1000
[*] Image Base @-- 0x40000000
```
## 6. Section Header
Then comes the section header, we can simply use `IMAGE_FIRST_SECTION` to get to it. We can loop through and print different sections and their respective output.
```c
PIMAGE_SECTION_HEADER pSectionHeader = IMAGE_FIRST_SECTION(pNTHeader);
for (size_t i = 0; i < pFileHeader.NumberOfSections; i++) {
printf("\n______________ %d: %s ________________\n\n", i + 1, pSectionHeader[i].Name);
info("Raw Addr: 0x%X", pSectionHeader[i].PointerToRawData);
info("Raw Size: 0x%X", pSectionHeader[i].SizeOfRawData);
info("Virtual Addr: 0x%X", pSectionHeader[i].VirtualAddress);
info("Virtual Size: 0x%X", pSectionHeader[i].Misc.VirtualSize);
info("Characteristics: 0x%X", pSectionHeader[i].Characteristics);
printf("\n[$] Has ");
_character = pSectionHeader[i].Characteristics;
if (_character & IMAGE_SCN_CNT_CODE) printf("code; ");
if (_character & IMAGE_SCN_CNT_INITIALIZED_DATA) printf("Initialized data; ");
if (_character & IMAGE_SCN_CNT_UNINITIALIZED_DATA) printf("Uninitialized data; ");
...
}
```
We can check the characteristics of each section as provided by [MSDN](https://learn.microsoft.com/en-us/windows/win32/debug/pe-format#section-flags) and print the information accordingly. Here's how the output would look like
```
______________ 1: .textbss ________________
[*] Raw Addr: 0x0
[*] Raw Size: 0x0
[*] Virtual Addr: 0x1000
[*] Virtual Size: 0x10000
[*] Characteristics: 0xE00000A0
[$] Has code; Uninitialized data; Read access; Write access; Can be executed as code;
______________ 2: .text ________________
[*] Raw Addr: 0x400
[*] Raw Size: 0xA800
[*] Virtual Addr: 0x11000
[*] Virtual Size: 0xA68F
[*] Characteristics: 0x60000020
[$] Has code; Read access; Can be executed as code;
______________ 3: .rdata ________________
[*] Raw Addr: 0xAC00
[*] Raw Size: 0x6000
[*] Virtual Addr: 0x1C000
[*] Virtual Size: 0x5E23
[*] Characteristics: 0x40000040
[$] Has Initialized data; Read access;
......
......
// Non Verbose Mode Output
################# S E C T I O N S #################
_______________________________________
[*] Section 1: .textbss
[*] Section 2: .text
[*] Section 3: .rdata
[*] Section 4: .data
[*] Section 5: .pdata
[*] Section 6: .idata
[*] Section 7: .msvcjmc╟☺
[*] Section 8: .00cfg
[*] Section 9: .rsrc
[*] Section 10: .reloc
_______________________________________
```
Nice, we are almost done, the final part is the import section.
## 7. Imports
This was the most difficult part and did took me quite a while to do. Although I still have some trouble printing the functions used in a library, I am able to print the library used.
```c
if (!_32_BIT) {
info("Export Table @-- 0x%X | Size: %d", pOptionalHeader.DataDirectory[0].VirtualAddress, pOptionalHeader.DataDirectory[0].Size);
info("Import Table @-- 0x%X | Size: %d", pOptionalHeader.DataDirectory[1].VirtualAddress, pOptionalHeader.DataDirectory[1].Size);
info("IAT @-- 0x%X | Size: %d", pOptionalHeader.DataDirectory[12].VirtualAddress, pOptionalHeader.DataDirectory[12].Size);
printImports(pFile2, pNTHeader, pOptionalHeader, pSectionHeader, Verbose);
}
else {
info("Export Table @-- 0x%X | Size: %d", pOptionalHeader32.DataDirectory[0].VirtualAddress, pOptionalHeader32.DataDirectory[0].Size);
info("Import Table @-- 0x%X | Size: %d", pOptionalHeader32.DataDirectory[1].VirtualAddress, pOptionalHeader32.DataDirectory[1].Size);
info("IAT @-- 0x%X | Size: %d", pOptionalHeader32.DataDirectory[12].VirtualAddress, pOptionalHeader32.DataDirectory[12].Size);
printImports32(pFile2, pNTHeader, pOptionalHeader32, pSectionHeader, Verbose);
}
// There is not much difference b/w the 64 & 32-bit version function
// so I'll show only one of them
VOID printImports32(LPVOID pFile2, PIMAGE_NT_HEADERS32 pNTHdr, IMAGE_OPTIONAL_HEADER32 pOptHdr, PIMAGE_SECTION_HEADER pSecHdr, BOOL Verbose) {
PIMAGE_IMPORT_DESCRIPTOR pImport = (PIMAGE_IMPORT_DESCRIPTOR)((DWORD_PTR)pFile2 + Rva2Offset(pOptHdr.DataDirectory[1].VirtualAddress, pSecHdr, pNTHdr));
LPSTR library[256];
DWORD bound = 0;
size_t c = 0;
info(" Libraries Used: \n");
while (pImport->Name != NULL) {
library[c] = (PCHAR)((DWORD_PTR)pFile2 + Rva2Offset(pImport->Name, pSecHdr, pNTHdr));
printf(" %s\n", library[c]);
pImport++;
c++;
}
}
```
Not certainly sure why I had trouble printing the member using the 64-bit version, something that I will look into later.
We convert the RVA to file offset using the `Rva2Offset` function and then add that to the start of the PE file to get to the Imports structure. After which we can just loop through until the Final import which has its name and every other member set to `NULL` , and while doing so we convert the RVA of the `Name` of the import to offset and print it. Here's a sample output
```
################# I M P O R T S #################
[*] Data Directory @-- 0xEBD8EF50
[*] Export Table @-- 0x0 | Size: 0
[*] Import Table @-- 0x274A0 | Size: 100
[*] IAT @-- 0x27000 | Size: 1184
[*] Libraries Used :
KERNEL32.dll
ADVAPI32.dll
VCRUNTIME140D.dll
ucrtbased.dll
```
## Conclusion
There are a lot of things that needs to be fixed / be better but for now we were able to print most of the data related to the PE file. Although I need to work on printing the function names imported from a DLL as well as the relocations / resources / exported functions, etc. I do am thinking to fix all of it and create a Rust equivalent which does a better job at it. If you have any suggestions or feel that there is some mistake, you can reach out to me on [twitter](https://x.com/ZzN1NJ4). I have uploaded the whole project on [github](https://github.com/ZzN1NJ4/peXtractor) so do check that out.
## References
*
*
*
*
*
*